Wednesday 25 June 2014

Xilisoft iPhone Transfer Uninstall Error – How To Fix This?

Xilisoft iPhone Transfer is the all-around iPhone transfer software which can easily copy and export iPhone songs, video, photo, eBooks, audio books to PC/iTunes and import PC files to iPhone with ease. This iPhone copy software can manage and transfer files between iPhone and PC, and use iPhone like a portable hard disk. It is the only iPhone transfer software that supports all types of iPhone including iPhone, CDMA iPhone 4, iPhone 3G, iPhone 3GS, iPhone 4, iPhone 4S, iPod touch, iPod touch 4 and iOS 4.2, iOS 4.3, iOS 5 & iTunes 10. High ripping speed and concise interface design make iPhone content management on your computer simple and convenient.
If the Xilisoft iPhone Transfer seems to screw up itself rather than doing its job on its PC, it should be replaced by one of the same kind.
  1. Download and save the Xilisoft iPhone Transfer uninstaller on Xilisoft’s website.
  2. Close all applications.
  3. Check the taskbar and the system tray to make sure that no user applications are running.
  4. Run the uninstaller.
  5. Click “Yes” to the message “Do you want to allow the following program to make changes to this computer?”
  6. Restart your computer.
In case, this doesn’t clean up all entries of Xilisoft iPhone Transfer, the new one won’t get installed until this get fixed.
  1. Turn to Start Menu again then you can see Run, click it to open it.
  2. Fill in the blank with regedit so as to activate the Registry Editor.
  3. Open plus folder HKEY_CURRENT_USER and HKEY_LOCAL_MACHINE to find out entries and values related to Xilisoft iPhone Transfer.
  4. Once you find them, delete them all.
  5. Lastly, reboot your computer.
As you may have aware that manual removal of the files and registry keys is difficult task. In this case, it requires you to be cautious when conducting manual deletion. There is the other way that helps you fully get rid of Xilisoft iPhone Transfer-using an uninstaller program.

Perfect Uninstaller, which works perfect in uninstalling programs like English To Hindi Character Converter, is highly admired by computer experts and users. With its Force Uninstall, it can surely help you forcibly uninstall Xilisoft iPhone Transfer, including its directories and keys thoroughly.

Bonjour for Windows Not Found On My Computer – What Is The Good Way To Have it Removed?

Bonjour, also known as zero-configuration networking, enables automatic discovery of computers, devices, and services on IP networks. Bonjour for Windows includes a plugin to discover advertised HTTP servers using Internet Explorer. Click the Bonjour icon in the Internet Explorer toolbar to enable Bonjour browsing. If you have Bonjour devices on your local network with embedded HTTP (Web) servers, they will appear in the list.
If it is really getting your nerve when the Bonjour for Windows misbehaves on your desktop, you will have no choice but let it go.
  1. Make hidden files and hidden folder visible.
  2. Start>My Documents>Tools>Folder Options>View>Advance settings>Hidden files and folders>Show hidden files and folders>OK
  3. Click Start, and then click Run.
  4. In the Open box, type %windir%\Bonjour for Windows\spuninst\spuninst.exe, and then click OK.
  5. Follow the wizard instructions to uninstall Bonjour for Windows.
In case this unfortunately hasn’t established a clear way for the Bonjour for Windows to go out, then it will go the other way.
  1. To make the removal successful, please close all the running programs.
  2. Open the Windows Task Manager by pressing Ctrl + Alt + Delete on the keyboard.
  3. End all processes related to Bonjour for Windows.
  4. Go to Start Menu and then click on Run.
  5. Enter regedit to activate the Registry Editor, and scroll down all folders to find and delete every related keys such as HKEY_CURRENT_USER\Software\Bonjour, HKEY_LOCAL_MACHINE\Software\Bonjour.
  6. Open system disc C: in the My Computer, and go to Programs Files folder.
  7. Locate a folder named Bonjour for Windows and delete all the files in it.
  8. Reboot your computer.
Is this removing Bonjour for Windows simple for you? However, this is not the perfect or the simplest method yet. Some related folders and files, and some registry entries were not uninstalled during the removal. And these leftovers will bring you trouble in the future if you cannot get rid of them completely. Hence, it is highly recommended users to use a reliable tool like Perfect Uninstaller. In this way, you can quickly get the Bonjour for Windows uninstalled or AccessTunes eliminated fully within steps as you can see below.
  1. After installing Perfect Uninstaller on your computer, close all other running processes or directly

  2. Run Perfect Uninstaller and locate and highlight Bonjour for Windows in the display name list.
  3. Press “Uninstall” and then follow the prompts to finish the uninstalling.

Can’t Remove Bonjour To Install iTunes? – Bonjour Uninstall Tips

TAGS: uninstall itunes completely, uninstall itunes manually, uninstall itunes without losing music
Can you delete Bonjour or remove it from control panel? Tracy hit the button to update ITunes and that’s where the problem began. It needed to remove iTunes and everything with it and it cannot remove bonjour. It says she doesn’t have privileges. Well, she has spent about 15 hours on the phone with Apple doing everything that could be done. She then took my computer to where she purchased it and stood with the technicians for 2 hours–on the phone they said “we have a way we can get it off” in the end, they could not. So now both Apple & the techs have said she is probably going to have to re-format her whole computer.
What is Bonjour?
Bonjour, also known as zero-configuration networking, enables automatic discovery of computers, devices, and services on IP networks. Meanwhile, it uses industry standard IP protocols to allow devices to automatically discover each other without the need to enter IP addresses or configure DNS servers.
If you do not want Bonjour to be in your computer and want to uninstall it, sometimes you can’t find any uninstaller for it! Even if you go to Control Panel’s Add or Remove Program, you can’t find the uninstaller there as well. Fortunately, here’s how to safely uninstall and remove the Bonjour service and files (mDNSResponder.exe and mdnsNSP.dll). Just follow the few simple steps below to remove Bonjour from your computer:
  1. Make sure you have administrator privileges before executing these commands.
  2. Go to Start > Run > type the command below and hit OK.
  3. “%PROGRAMFILES%\Bonjour\mDNSResponder.exe” -remove
  4. Navigate to C:\Program Files\Bonjour
  5. Rename the mdnsNSP.dll file in that folder to mdnsNSP.old
  6. Restart your computer
  7. Delete the Program Files\Bonjour folder
To know if you have actually uninstalled Bonjour, go to Start > Run and type services.msc. Look for Bonjour Service name. If it is not there, then it has been uninstalled. But the folder and files remain in the program files folder. Just in case you want to install it again.
If you seem to have Bonjour stuck in a state where it will not uninstall or upgrade, or you have tried a manual uninstall but it still appears in the programs and features list, the last resort should a professional uninstaller like Perfect Uninstaller for Bonjour program.

With Perfect Uninstaller running on your computer, all you have to do is navigate to the Bonjour icon or folder in the hard drive and then right click to select the uninstall option. You can click here to download Perfect Uninstaller now to let it automatically take care of the removal process of Bonjour or other iTunes product.

How Do I Uninstall Apple iTunes 10.5 Correctly?

TAGS: cannot uninstall itunes, does uninstalling itunes delete your music, itunes remover
Are you still in trouble using or uninstalling iTunes software? Apple iTunes 10.5 is a free application for PC as well as Mac. It plays all your digital music and video. It syncs content to your iPod, iPhone, and Apple TV. And it’s an entertainment superstore that stays open all day long. At the mean time, iTunes brings a handful of enhancements to Apple’s ubiquitous media software, including iTunes Match, the cloud-based music-matching service that makes your music available on all your authorized devices.
Common ways to uninstall Apple iTunes 10.5 product
  1. Click Start, and then click Run. Type taskmgr in the box and then press OK to open Task Manager. End all programs of Apple iTunes 10.5 in Task Manager.
  2. Click Start and then Click Control Panel.
  3. Double click Add/Remove Programs.

  4. In the list of currently installed programs, select Apple iTunes 10.5, and then choose Remove.
  5. Follow the prompts to finish the removal of Apple iTunes 10.5.
If you have previously uninstalled Apple iTunes 10.5 products and related peripherals and that it is safe to remove these folders:
  1. Using Windows Explorer, locate and delete the installation folder for each Apple iTunes 10.5 product that was uninstalled in the previous procedures, e.g., “C:\Program Files\ iTunes”.
  2. Delete the folders, “C:\Program Files\Common Files\Bonjour”, “C:\Program Files\Common Files\QuickTime”
One of the great uninstaller software to do the job for you is called the Perfect Uninstaller and it will uninstall any program or software such as BitTorrent. Technically, it works like this:
Firstly, it will uninstall the Apple iTunes 10.5 of related programs. Once that has been done, it will scan through your drives and your registry to make sure that every single file or registry entry has been detected and removed from your computer as you can see the steps below:
  1. After closing all associated files, folders, and processes, run Perfect Uninstaller.
  2. Highlight Apple iTunes 10.5of related stuffs (one a time) in the “Display Name” list and click on “Uninstall” button.

  3. Follow the on-screen steps to uninstall Apple iTunes 10.5 from the computer.

Fully uninstall WinFax PRO 10

TAGS: add remove program, software uninstaller free
Symantec the uncontested and unrivalled worldwide communicating software manufacturer leader comes back to us with a new milestone of its awesome fax software which is sold all around the world. WinFax PRO 10.0 is the leading fax management software for small businesses. Its high-quality faxes help you project a professional image to your clients and customers. When image clarity is vital, you can generate photo-quality faxes. You can even send or forward faxes via email to people who don’t have fax hardware or software. WinFax PRO is easy to set up, learn, and use. And it integrates smoothly with key business applications to simplify your management of client and customer interactions. It is a major update of the software that henceforth works perfectly with Microsoft Windows 2000. Now it also supports Windows® XP.
Problems with WinFax are often difficult to solve because the source of the problem is hard to isolate. If the problems persist, the best way is to fully uninstall the application and install again.
To uninstall the program from Cantrol Panel has been approved with disadvantages. Now, the Perfect Uninstaller is designed as a troubleshooting tool which is a combination of multifunction and usability. Below we are going to show you how to fully uninstall WinFax PRO 10:
Step 1:  Right click on the WinFax icon of the right hand corner tray bar to exit the program.

Step2: Double click the Perfect Unistaller desktop icon to run the program. Then select WinFax PRO10 from the application list and click Uninstall button to carry out.

Step3: Keep clicking next untill the uninstalling completed automatically.
By the way, we also provide this uninstallation in the item Special Uninstall for your reference in case needed.
Notes:1. It is better that you uninstall the applications in the safe mode.
2. Please reboot the pc after the operation.

Tuesday 24 June 2014

Uninstall WOT addon – How to Uninstall WOT addon Entirely

Description: How to uninstall WOT addon? WOT addon is a common program that can be used to ensure you a convenient PC life. WOT addon is developed by Adobe Systems Incorporated, a world leading software developer. Even if WOT addon has the ability to offer you a series of functions to make it far more comprehensive to run a PC than other brands of flash players, you have to uninstall it as soon as possible when the situations occur:
  • You cannot update WOT addon to the latest version.
  • The related files with WOT addon are damaged maliciously by malware and cannot be invoked smoothly to run WOT addon .
  • Another flash player is not compatible with WOT addon.
  • Due to its vulnerability problems, WOT addon sometimes keeps crashing or eats up a lot of resources to run on your computer that can drastically slow down your PC, degrade overall system performance and lead to software instability.
  • Some integrated files of WOT addon run at the background and system startup which may lead to silent malware intrusion.
How to uninstall WOT addon manually?

If you have to uninstall WOT addon, we sincerely suggest you firstly apply the manual removal method. You can follow the easy steps to uninstall WOT addon:
  1. Click Start menu, and then run Control Panel.
  2. Select the Add or Remove Programs option.
  3. In the Currently installed programs list, click WOT addon option.
  4. Select WOT addon in the Add/Remove program list, and then click the Remove button to manually uninstall WOT addon .
Caution! We cannot ensure you to entirely uninstall WOT addon manually due to the fact that if you have to uninstall it, you have to uninstall its related files, excutable files, processes and registry keys. These activities may lead to crucial system files corruption, system freezes and Blue Screen of Death errors. To fully uninstall WOT addon , we highly recommend you to enable a highly praised and ultra powerful WOT addon uninstaller on your PC.
Recommended: Uninstall Programs Successfully Here

How to uninstall WOT addon entirely?
If you have to uninstall WOT addon, the best method is to enable a highly praised WOT addon uninstaller on your computer. It aids in fully uninstalling WOT addon and any other kinds of non removal software via its built- in revolutionary uninstall utility combined with ultra comprehensive system optimization tools. The highly praised WOT addon uninstaller offers you with a far more effective uninstall journey than other brands of uninstaller, because:
  1. The ultimate solution empowers you to completely uninstall WOT addon and any other kinds of software, add- on, plug- in, context manual, unwanted programs and malicious applications and entirely wipe out protected file associations, non- removal empty registry keys, embedded registry keys, invalid application paths, obsolete file extensions, invalid program shortcuts and corrupted startup programs, to ensure you an error- free PC.
  2. It can successfully perform any uninstall tasks with a highly user –friendly interface.
  3. It shows detailed information of each program and application installed on your PC.
How to uninstall WOT addon easily?
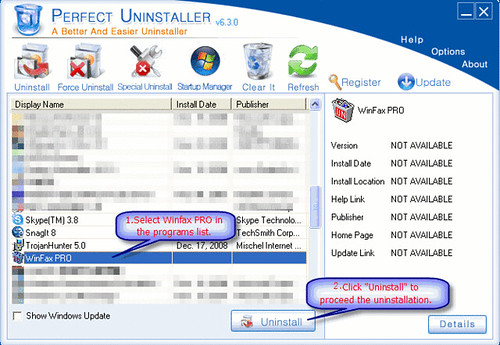
If you have to uninstall WOT addon , we highly recommend you to follow the simplest methods below to enable the ultra powerful WOT addon uninstaller:
1. Free download Perfect Uninstaller here.
2. Double click to finish the installation.
3. Highlight “WOT addon” in a “Display Name” list and then select “Uninstall” to finish the uninstall process.
4. Follow the instructions on the screen to completely uninstall WOT addon

Uninstall IE8 – How to Uninstall IE8 Completely

Description: How to uninstall IE8? IE8 is a popular browser that can be used to ensure you a convenient PC life. IE8 is developed by a world leading software developer. However, some users encounter various problems when using IE8:
  • You cannot update IE8 to the latest version.
  • The related files with IE8 are damaged maliciously by malware and cannot be invoked smoothly to run IE8 .
  • Another browser is not compatible with IE8.
  • Due to its vulnerability problems, IE8 sometimes keeps crashing or eats up a lot of resources to run on your computer that can drastically slow down your PC, degrade overall system performance and lead to software instability.
  • Some integrated files of IE8 run at the background and system startup which may lead to silent malware intrusion.
How to uninstall IE8 manually?

If you have to uninstall IE8, we sincerely suggest you firstly apply the manual removal method. You can follow the easy steps to uninstall IE8:
  1. Click Start menu, and then run Control Panel.
  2. Select the Add or Remove Programs option.
  3. In the Currently installed programs list, click IE8 option.
  4. Select IE8 in the Add/Remove program list, and then click the Remove button to manually uninstall IE8.
Caution! We cannot ensure you to entirely uninstall IE8 manually due to the fact that if you have to uninstall it, you have to uninstall its related files, excutable files, processes and registry keys. These activities may lead to crucial system files corruption, system freezes and Blue Screen of Death errors. To fully uninstall IE8 , we highly recommend you to enable a highly praised and ultra powerful IE8 uninstaller on your PC.
Recommended: Uninstall Programs Successfully Here

How to uninstall IE8 entirely?
If you have to uninstall IE8, the best method is to enable a highly praised IE8 uninstaller on your computer. It aids in fully uninstalling IE8 and any other kinds of non removal software via its built- in revolutionary uninstall utility combined with ultra comprehensive system optimization tools. The highly praised IE8 uninstaller offers you with a far more effective uninstall journey than other brands of uninstaller, because:
  1. The ultimate solution empowers you to completely uninstall IE8 and any other kinds of software, add- on, plug- in, context manual, unwanted programs and malicious applications and entirely wipe out protected file associations, non- removal empty registry keys, embedded registry keys, invalid application paths, obsolete file extensions, invalid program shortcuts and corrupted startup programs, to ensure you an error- free PC.
  2. It can successfully perform any uninstall tasks with a highly user –friendly interface.
  3. It shows detailed information of each program and application installed on your PC.
How to uninstall IE8 easily?
If you have to uninstall IE8 , we highly recommend you to follow the simplest methods below to enable the ultra powerful IE8 uninstaller:
1. Free download Perfect Uninstaller here.
2. Double click to finish the installation.
3. Highlight “IE8” in a “Display Name” list and then select “Uninstall” to finish the uninstall process.
4. Follow the instructions on the screen to completely uninstall IE8.